又一个新的ORM框架,但是Prisma宣传是下一代ORM。下一代、次时代的说法也太多了,不知道从哪起算……
# Prisma简介
但是粗略看了下确实非常不错。TypeScript, Node.js,正好贴合我的习惯,数据库支持MySQL, PostgreSQL, MongoDB和一些其他的,足够用。通过数据模型直接生成数据库表结构,也无需再次定义TS类型,点赞。关联表的操作非常直观,有些API写法类似Mongo和Mongoose,上手不复杂。
我主要是从 https://github.com/unix/koa-ts 这个库了解到该框架,本文大多数代码都来自此库。但是由于运行报错,本机也只装了MongoDB没有PG环境,就自己尝试一步步组装一个MongoDB的版本。
本文的涉及的源码和步骤都放在了 Github (opens new window)
可以直接克隆 git clone https://github.com/Rackar/prisma-koa-mongodb-starter.git
对了,推荐使用pnmp代替npm和yarn。用法类似yarn,全局安装npm i -g pnpm
本文的运行命令都是使用pnpm
mongoose迁移到Prisma (opens new window)
# MongoDB转换为副本集
首先需要将Windows本机的MongoDB转换为副本集,因为Prisma的事务需要,在配合MongoDB时需要连接副本集。 如果是其他关系型数据库则不需要。
暂停本机mongodb 使用管理员权限打开powershell
net stop MongoDB
cd "D:/Program Files/MongoDB/Server/4.4"
# 确定本目录下有data和log目录
./bin/mongod.exe --port 27017 --dbpath ./data --logpath ./log/mongod.log --logappend --replSet rs0 --bind_ip localhost
1
2
3
4保持这个PS窗口不要关闭,另开一个新的PowerShell:
cd "D:\Program Files\MongoDB\Server\4.4"
./bin/mongo
rs.initiate()
show dbs
1
2
3
4测试成功说明副本集可以正常开启。但是手动窗口参数启动比较麻烦,还需要一直前台开启,我们下步修改服务配置,开启默认使用副本集设置。
修改服务配置文件 修改
D:\Program Files\MongoDB\Server\4.4\bin\mongod.cfg,增加这两行。replication: replSetName: rs01
2整个配置文件如下:
# mongod.conf

# for documentation of all options, see:
#   http://docs.mongodb.org/manual/reference/configuration-options/

# Where and how to store data.
storage:
  dbPath: D:\Program Files\MongoDB\Server\4.4\data
  journal:
    enabled: true
#  engine:
#  mmapv1:
#  wiredTiger:

# where to write logging data.
systemLog:
  destination: file
  logAppend: true
  path:  D:\Program Files\MongoDB\Server\4.4\log\mongod.log

# network interfaces
net:
  port: 27017
  bindIp: 127.0.0.1


#processManagement:

#security:

#operationProfiling:

#replication:
# 为了Prisma需要,开启副本集
replication:
  replSetName: rs0
#sharding:

## Enterprise-Only Options:

#auditLog:

#snmp:
1
2
3
4
5
6
7
8
9
10
11
12
13
14
15
16
17
18
19
20
21
22
23
24
25
26
27
28
29
30
31
32
33
34
35
36
37
38
39
40
41
42
43保存后重新启动服务或用命令
net start MongoDB
# 安装和初始化项目
这步安装和初始化了Prisma数据演示结构和Client。可以使用ts执行。
启动脚本为 pnpm go
"scripts": {
    "dev": "prisma generate",
    "go": "ts-node ./src/index.ts"
  },
2
3
4
查看截止此步的源码:
git checkout dbc5ee2e8cabd970e915242049d7ac25e1ce6219
或者在Github上查看 (opens new window)
# 添加koa进行接口查询
pnpm add koa koa-bodyparser koa-logger koa-multer koa-router
pnpm add -D @types/koa @types/koa-bodyparser @types/koa-logger @types/koa-router
2
进行演示性api编写
  const app =await createServer()
  app.use(routes.routes());


  router.get("/", async (ctx) => {
    await list(ctx)
  })

async function list(ctx){
  const allUsers = await prisma.user.findMany({
    include: {
      posts: true,
    },
  })
  ctx.body = {
    message:'ok',
    data:{ allUsers }
  }
}
2
3
4
5
6
7
8
9
10
11
12
13
14
15
16
17
18
19
GET http://127.0.0.1:3002/api/test/ 成功返回结果
查看截止此步的源码:
git checkout c2e624ff20af57065d63c316f364d4819d09a31b
或者在Github上查看 (opens new window)
# 添加routing-controllers进行装饰
pnpm add routing-controllers reflect-metadata typedi class-validator class-transformer dotenv
添加装饰器、反射,环境适配。测试装饰器路由
@Post('/users')
  async create(
    @BodyParam('email') email: string,
    @BodyParam('username') name: string,
  ) {
    if (!name) {
      throw new BadRequestError('username is required')
    }
    return await this.usersService.create({email, name })
  }
2
3
4
5
6
7
8
9
10
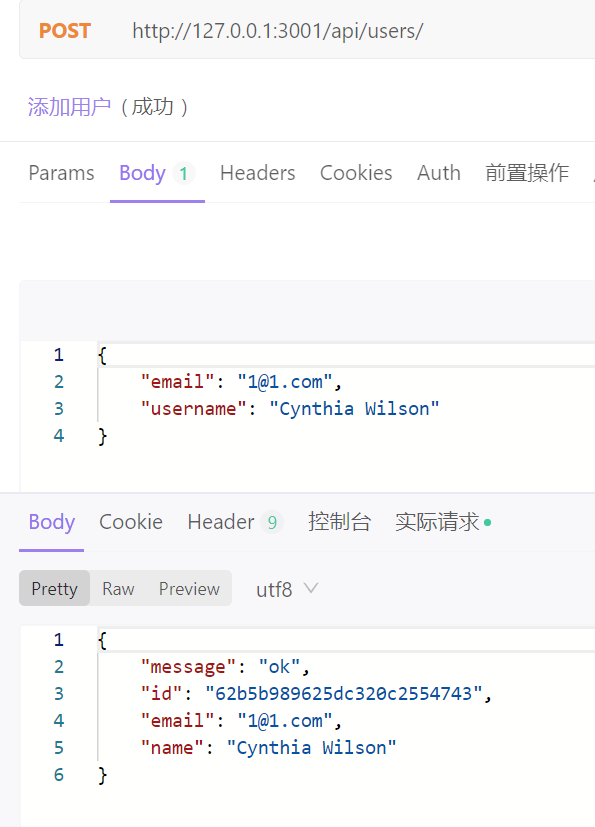
测试添加用户成功。拦截器生效具有ok字段。入参username,后续name, 可以正常适配。
GET http://127.0.0.1:3001/api/users/ 接口已通。可以查询、新增(POST)
查看截止此步的源码:
git checkout 8a86312a746b84c35558444196e42cb37b059a9a
或者在Github上查看 (opens new window)
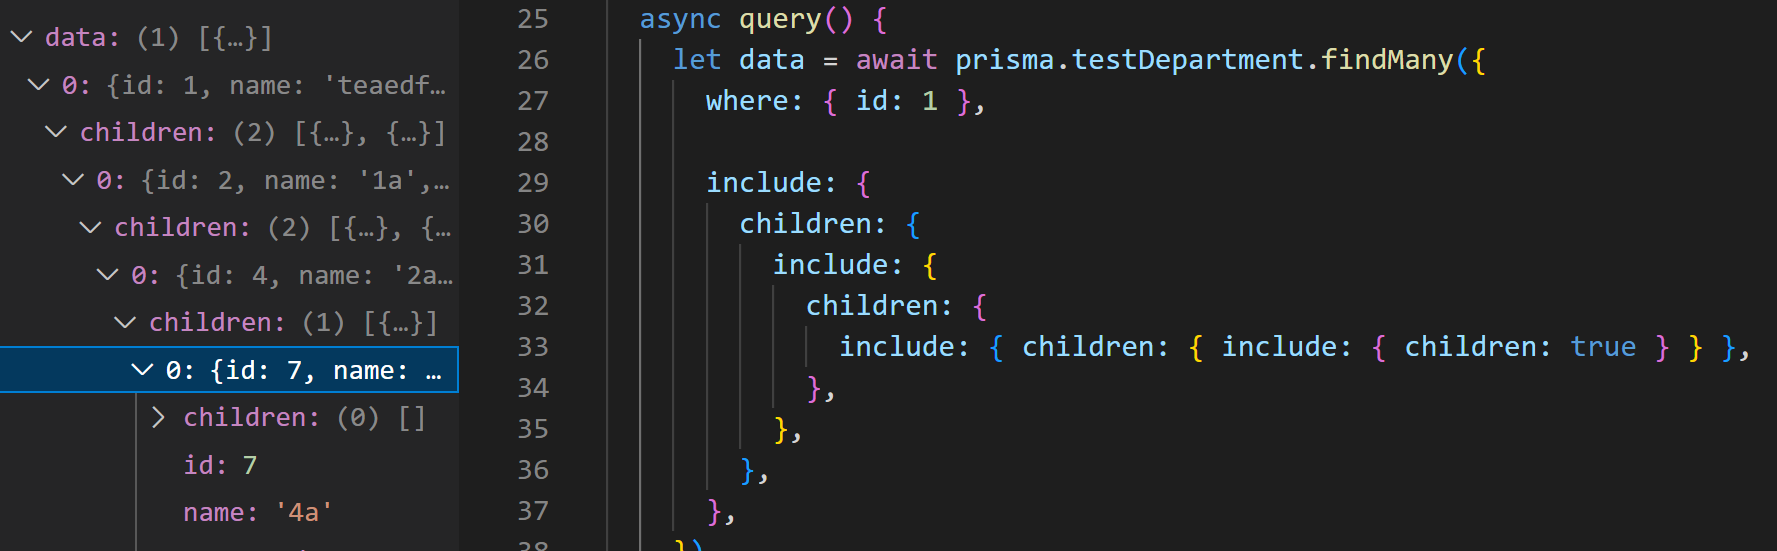
树形查询
为了做树形递归查询的测试,做了一个实验性的schema。
model testDepartment {
  id       Int              @id @default(autoincrement())
  name     String
  parent   testDepartment?  @relation("parent", fields: [parentId], references: [id])
  children testDepartment[] @relation("parent")
  parentId Int?
}
2
3
4
5
6
7
但是在文档里没有找到如何递归遍历,最后用只好嵌套include指定层数去查。